

Have You ever seen a movie or a TV show featuring programmers or hackers? We all know the scene: a guy, preferably in a hoodie, slouching in front of a PC, typing so fast you probably wouldn’t be able to hit your keyboard randomly. A hundred lines of code jumping in front of his widely opened eyes, not allowed to blink.

Even though it’s not possible to code this way, there are ways we can speed up a little bit of our work. The one we’ll look into today is called “snippet”.
What are snippets?
Snippets are small blocks of predefined code that we can insert into our editor using a simple combination of keys. We can use ones premade by Microsoft or create our own. It’s fairly simple to create one and it can speed up our work quite a lot.
Let’s start from the premade snippets for the .NET programmers, so we know exactly how to use them.
The first one we’ll look into is used to create a parameterless constructor in our class. We call it by using the word “ctor” and pressing the Tab key twice.
Most of the snippets are called by some simple combination and double press on the Tab key.
Another one, very useful when You’re working on Console Application is called by the acronym “cw”. It adds command:
Console.WriteLine()
with the System namespace if needed.
Another cool thing about snippets is the fact, that we can surround some part of our code with a predefined block of code. To do so, we have to highlight the lines we want to surround, press ctrl + k, ctrl + s and type the name of the snippet, or press the right mouse button on the highlighted text and navigate to Snippet -> Surround With.
Create your first snippet
Let’s start with something simple: we’ll create a snippet for inserting data context property to our class. Let’s get into it!
<?xml version="1.0" encoding="utf-8" ?>
<CodeSnippets>
    <CodeSnippet Format="1.0.0">
        <Header>
            <Title>DataContext</Title>
            <Shortcut>dc</Shortcut>
            <Description>Code snippet for DataContext (project specific)</Description>
            <Author>Adrian Snooking Konkol</Author>
            <SnippetTypes>
                <SnippetType>Expansion</SnippetType>
            </SnippetTypes>
        </Header>
        <Snippet>
            <Imports>
                <Import>
                    <Namespace>Snippets.Data</Namespace>
                </Import>
            </Imports>
            <Code Language="csharp"><![CDATA[
private readonly SnippetDataContext _dataContext;$end$]]>
        </Snippet>
    </CodeSnippet>
</CodeSnippets>
Now, let’s dive into the anatomy of the .snippet file:
CodeSnippets is the root element of our snippets, it can contain all the snippets we want to add, although it’s best practice to have only one snippet per file.
CodeSnippet element defines our single snippet. The format attribute is required, but we can fill it freely. Each CodeSnippet element contains two children: Header and Snippet.
The header element contains all the basic information about our snippet, like the title or shortcut. Here we can also add information what’s the type of our snippet: in this case, it’s expansion, which means the code can be inserted at our cursor. We can also add the type SurroundsWith which would allow us to surround the highlighted code just as with the foreach from the previous example.
In the Snippet element, we’re finally implementing our code snippet. There are a few things we can specify here, that we need for our predefined code. In this case, we’ve used the Imports element. There we can declare all the namespaces, so our code is ready to go from the moment we’ve inserted it. The same flow can go for the References -> Reference -> Assembly, so all assemblies are referenced.
At last, we’ve come to the Code element. It’s the only child we require for the Snippet element. First, we need to add the Language attribute, so our editor will know when to look for this snippet. Then in the <![CDATA[ ]]> we’re adding the boilerplate code we want to use with this snippet. In the example above it’s: private readonly SnippetDataContext _dataContext;$end$ – where $end$ is a word used to mark where the cursor should be after we’ve added our code. Now save the file with the snippet extension and…
… that’s it! We’ve created our first snippet! Now, let’s import it to the Visual Studio. To do so, we need to open the Code Snippets Manager. We can do that by clicking on the Tools -> Code Snippets Manager… or by a shortcut: ctrl + k, ctrl + b.
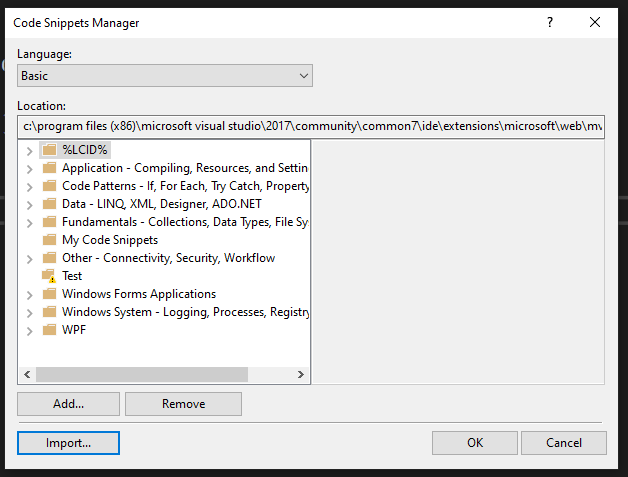
Now we need to click on Import, find the snippet we’ve just created and then click Finish.
And voila! Our snippet is ready to use:

More advanced snippets
Let’s see what else we can do while creating a snippet. This time we’ll try to boilerplate the Http Get request that uses the operation factory to create a query. Let’s see how it’d look like.
<?xml version="1.0" encoding="utf-8"?>
<CodeSnippets>
    <CodeSnippet Format="1.0.0">
        <Header>
            <Title>HttpGet</Title>
            <Author>Adrian Snooking Konkol</Author>
            <Description>Adds HttpGet Request prefilled with usual body.</Description>
            <Shortcut>get</Shortcut>
        </Header>
        <Snippet>
            <Declarations>
                <Literal>
                    <ID>QueryName</ID>
                    <ToolTip>Replace with proper query.</ToolTip>
                    <Default>IQuery</Default>
                </Literal>
                <Literal>
                    <ID>MethodName</ID>
                    <ToolTip>Replace with method name You want to use.</ToolTip>
 <Default>Name</Default>
                </Literal>
                <Object>
                    <ID>Route</ID>
                    <Type>string</Type>
                    <ToolTip>Replace with a proper Route.</ToolTip>
                    <Default>Route</Default>
                </Object>
            </Declarations>
            <Code Language="CSharp">
                <![CDATA[[HttpGet, Route($Route$)]
        public async Task<IActionResult> Get$MethodName$()
        {
            var result = await _operationFactory
                .Create<$QueryName$>($end$)
                .HandleAsync();

            if (!result.HasSucceeded)
            {
                return BadRequest(result.Errors);
            }

            return Ok(result.Data);
        }]]>
        </Snippet>
    </CodeSnippet>
</CodeSnippets>
This time in the Snippet element we can see Declarations. Here, we can specify Literal and Object elements:
- Literal – specifying part of the code that’s entirely in the snippet we’re creating and that we’d be changing almost every time we’re using the snippet.
- Object – specifying an item that’s used by the snippet, but is defined outside of it (e.g. as property inside the class).
Both Literal and Object contains ID, Type, and Default, although Object contains also the Type element. Both can also contain Function element, but in this tutorial, we’re going to skip this one. If You’d like, You can read more about it here: Code Snippet Functions – Visual Studio.
The ID element is the name of a variable we’re gonna use in our boilerplate by adding $ in front of and at the end of the variable (e.g. $QueryName$ or $Route$).
Default is a value that will be inserted in our boilerplate code at the moment we’ve used our snippet.
Once we’ve added the proper Literals and Objects to our Code element, we’ll be able to jump between them via the Tab button once we’ve imported our snippet. In case we don’t want to change one of the values, we can just skip it with the Tab button and after pressing Enter, we won’t have to change any other values (as seen below).

There’s also a possibility to add new snippets via Resharper’s Templates Explorer (Extensions -> Resharper -> Tools -> Templates Explorer), but I’ll let You look into this feature by yourself.
Summary
Snippets are one of the most efficient ways of speeding up your daily work and yet so few people bother to spend a little time to create their own, personalized ones. Hopefully, with this article, You’ll be able to create your own boilerplates in no time and speed up your coding process in .NET. And someday maybe we all will be feeling as freely with our editor as Jim Carrey does.