
Video conferencing software has been booming in popularity in recent years, I suppose I don’t have to explain why that is! I am assuming some of you may have thought of building your own video conferencing solutions for whatever reasons, so I decided to share a bit of my experience with the Jitsi platform. Jitsi is in my opinion one of the easiest ways to start building your own video conferencing products. It is a fully open source platform providing tons of existing codes that you would otherwise spend long man-months building your own software. I made some serious research and yet did not find anything that would provide a good developing experience and decent documentation. In my use case I was asked to build a meeting reservation system on top of Jitsi system so that admins could create meeting links that would only work in scheduled time windows – it was basically an eLearning scenario. In this article I will introduce you to the Jitsi ecosystem and the steps I have made to add the reservation capabilities including source code for my new reservation module.
What are the building blocks?
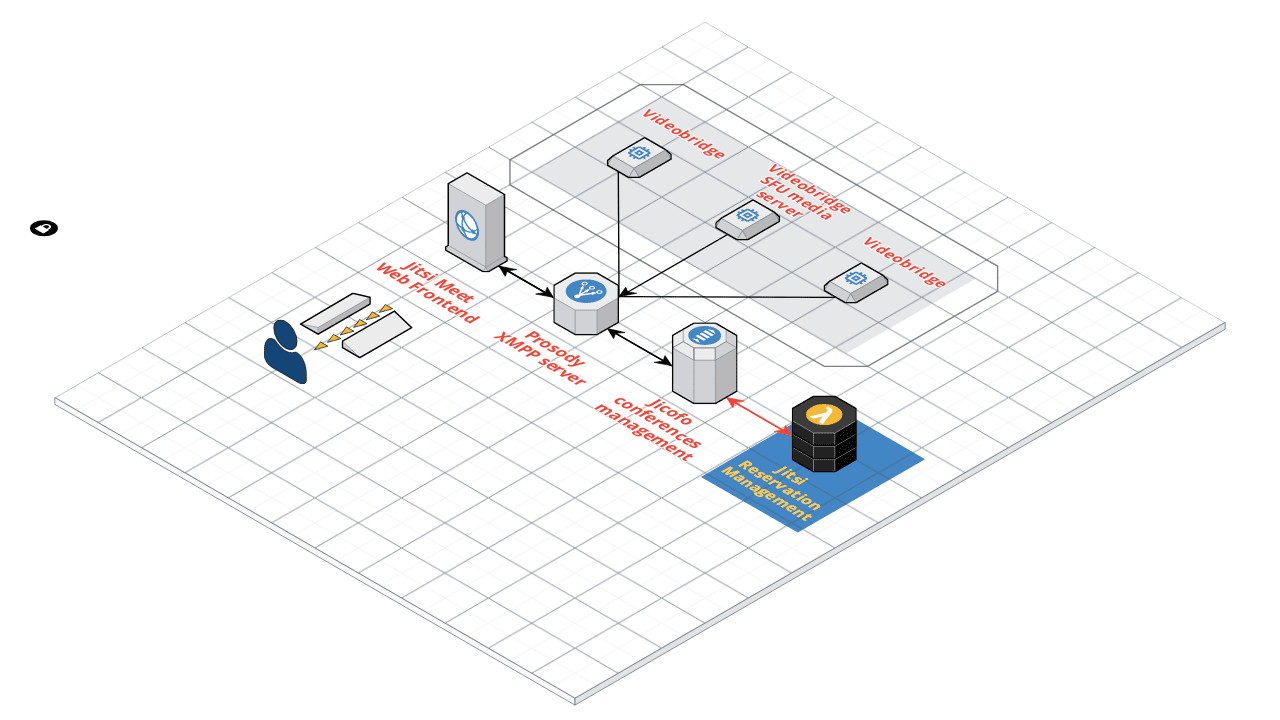
The above image illustrates the connection between the core Jitsi components, each of which can be installed on a different machine. The blue highlight shows the new component to be created. Perhaps, the best way to introduce you to the product is by sharing some technical headlines and then listing available modules and capabilities:
- Backend Code: Java – you may not need to change them at all in a lot of cases, it provides tons of configurable capabilities.
- Frontend Code: React – Well written and easy to extend.
- Mobile App (iOS and Android) Code: React Native – unfortunately, you will not be able to build it on Windows.
And as for the core modules (some of which are optional), we have:
- Jitsi Meet – The frontend WebRTC compatible React app, core of user experience allowing for calls themselves as well as basic configuration.
- Jitsi Videobridge – The heart of the platform, this is what manages video streams. You have to respect the dev work that went into this. Videobridge is what you will want to scale – although you may not need to as a single bridge should be able to process thousands of simultaneous streams on your average 2020 server.
- Jitsi Conference Focus – Optional module for adding session management and basic meetings scheduling. It lacks a decent API for a meeting reservation management, and I have explained how to build this, later in this article.
- Jitsi Gateway to SIP – Optional module adding support for things like VoiceIP software and devices. Think – dialling in to the online conference from VoiceIP phone or other device.
- Jibri – Optional module adding conference recording. When configured, React app record button will become active.
- Prosody – This module handles all the low level messaging in an industry standard XMPP protocol. It allows for a maximum compatibility with various communication devices supporting XMPP.
Hopefully the aforementioned information gives you some idea on the complexity of real-time communication software and how great is it that Jitsi implements all of these awesome functionalities for you. I know that programmers like to code but in my opinion the best code is the one you do not have to write. Thanks to this awesome opensource project, you can focus on what matters – building better UI and adding custom features specific to your domain.
Local setup
I think it will suffice to say that the documentation is fairly comprehensive on the subject of installation. You will need a Debian/Ubuntu server for which quick as well as detailed installation steps are provided here. You can also use a ready docker image which is what I did just because its quicker to get it all running this way – instruction for this can be found here.
Adding a meeting reservation module – high level
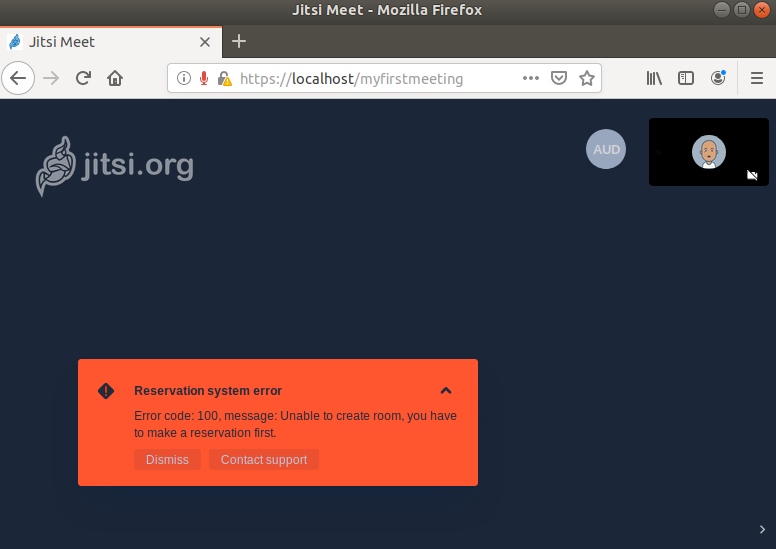
In the following sections, I will describe how to extend the system with the custom Reservation Manager and how to modify the Jitsi Meet frontend react app integrated into the platform. I know a lot of people including me need some ready solution for this, and I hope, they find this article and save some time building it themselves. If you are not interested in this functionality it may still be worth to have a look as you will see some innerworkings and integration points that should give you an idea on how easy it is to work with Jitsi. Default installation of Jitsi allows anyone with the link to start or join meetings. The behaviour can be modified so that Jitsi will use an external reservation system to validate conference eligibility. The aim is to enable the system to display the error message to those who attempt to start a conference using the website without making a reservation first.
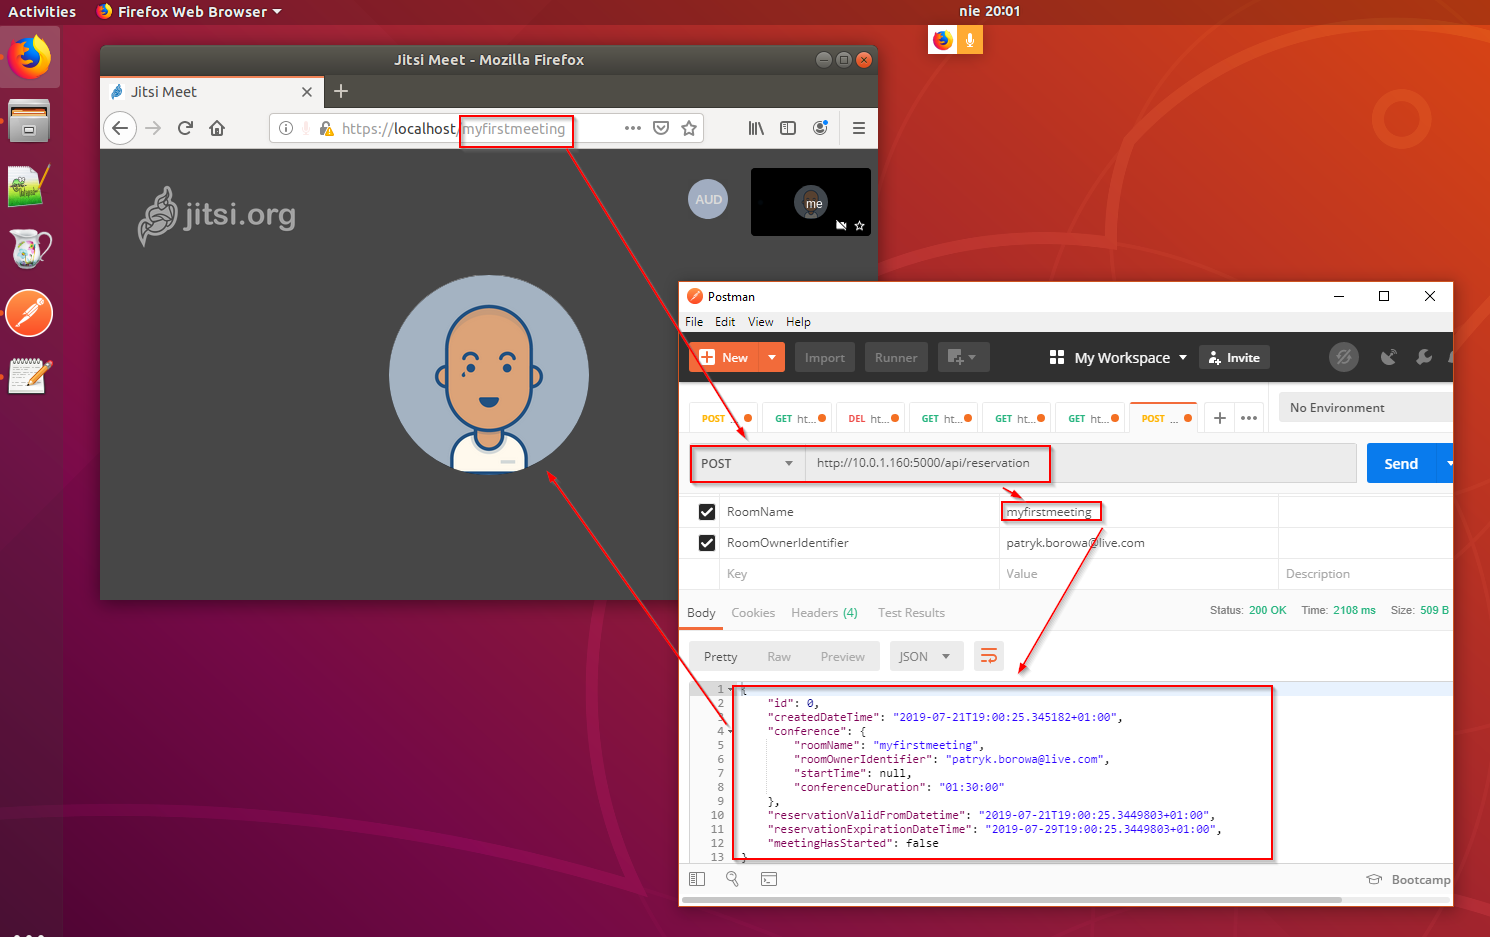
The API I created can be utilized via any REST client. For our scenario we will use Postman to execute API calls to create conference reservation. The Jitsi server will later query our rest API whenever user attempts to start a conference with the particular name:
Create a Reservation System and Dockerize it for Easy Deployment
Our reservation system will be called by Jitsi automatically whenever someone attempts to create a conference call. Our API has to be implemented in a minimum of 3 specific endpoints returning specific http responses defined in the documentation. Specifications for the API can be found here – its’ a short description of 3 methods:
- Api/conference [POST] method: Jitsi will call this passing conference and user details so that we can respond with allow or not allow
- Api/conference/{id} [GET] method: Jitsi calls this in case of a conflict (if someone tries to create a room with the same name twice). This allows it to get some details on the conflicting session
- Api/conference/{id} [DELETE] method: Jitsi calls this when all the users have left the conference
Sample code I created can be found here, this includes the “Dockerfile” with a simple setup to dockerize .NET Core WebApi2 project – it was based on this example from the docker manual.
Time to get our hands dirty
What is left now is the DevOPS work of configuring everything to work together. So, depending on your level of knowledge and how comfortable you are with the systems setup and configurations you may want to stop here and refer your friendly neighbourhood DevOPS engineer to the second part of this article. If, however, you are interested in what is necessary to get our rest of the reservation API to work with Jitsi platform please continue to part two here.
Spoiler alert – this is what we will go over in the part 2:
- We will clone the custom reservation system I built from my GitHub here.
- We will build a docker image for the Reservation System and store its content in .tar file
- We will run a virtual machine with a clean Ubuntu installation.
- We will copy our Docker image to the Ubuntu and run it there.
- We will setup and run Jitsi Platform docker image on the Ubuntu alongside our Reservation System.
- We will configure Jitsi Jicofo extension point to query our Reservation System to check for meetings eligibility.
I hope you find this article a useful introduction to the Jitsi platform, and as always, please leave your thoughts in the comments below.
Author of this blog is Patryk Borowa, Aspire Systems.